Connect to VPS in 5 Minutes
Got a VPS or cloud server? You’re minutes away from managing it with Nexus. This guide walks you through getting your server ready and connected to the app.
What You’ll Need
- A VPS/Cloud Server: Running Ubuntu, Debian, CentOS, or any Linux distribution
- SSH Access: Root or sudo user credentials
- The Nexus App: Installed on your iOS device
- 5 Minutes: Seriously, that’s all it takes
Quick Setup Overview
- Get your server connection details from your provider
- Open Nexus and add your server manually
- Enter your SSH credentials
- Start managing your server
That’s it! No complex configuration, no scripts to run manually. Nexus handles the setup.
Step-by-Step Setup
Step 1: Get Your Server Details
You’ll need three pieces of information from your VPS provider:
- IP Address: Your server’s public IP (e.g.,
203.0.113.45) - Username: Usually
rootorubuntudepending on your provider - Password or SSH Key: Your authentication method
Find these in your provider’s dashboard (see provider-specific guides below).
Step 2: Open Nexus and Add Your Server
- Launch the Nexus app on your iOS device
- Tap ”+” to add your VPS manually
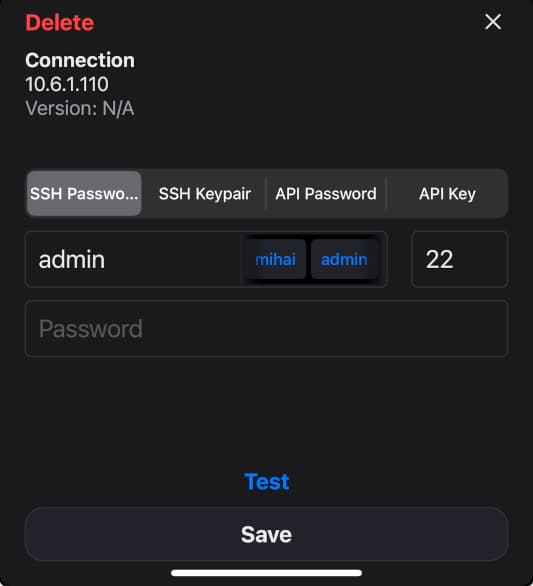
- Enter your server details:
- Host: Your server’s public IP address
- Username: Your SSH username (usually
rootorubuntu) - Port:
22(default SSH port, unless you changed it) - Password/Key: Your authentication credentials
Step 3: Connect and Install the Agent
- Tap “Connect” - Nexus will establish an SSH connection
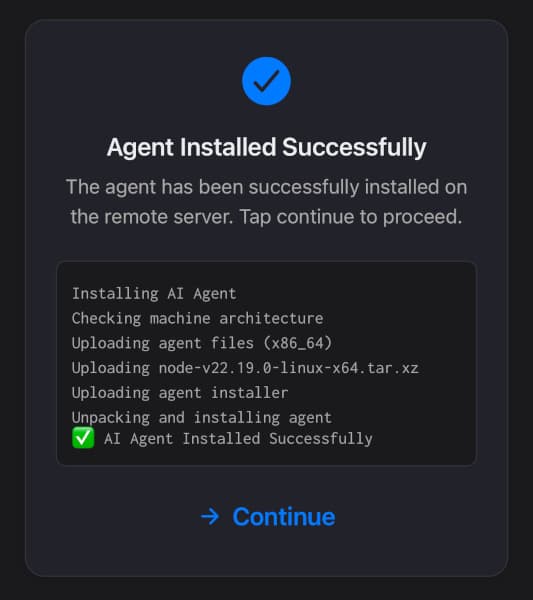
- Install the agent (optional but recommended):
- When you first open the console view, you’ll be prompted to install the agent runtime
- The agent enables AI diagnostics, automated fixes, and advanced monitoring
- Installation happens via SSH in your user’s home directory
- Takes less than 30 seconds
Step 4: Start Managing Your Server
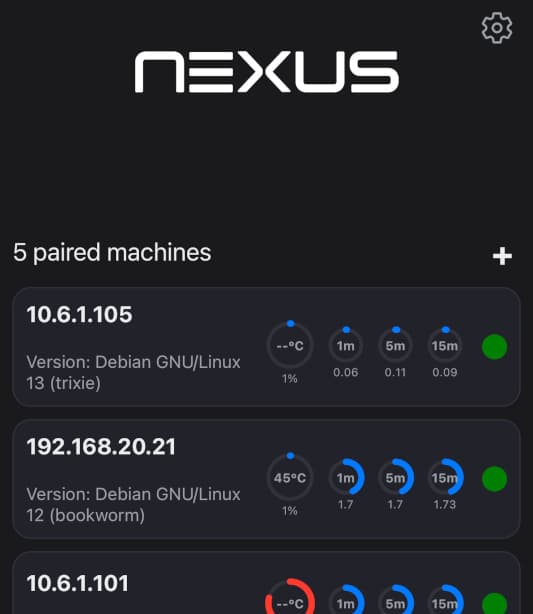
You’re done! Your server now appears in the Nexus dashboard with:
- Real-time CPU, RAM, and disk usage
- System load averages
- Operating system information
- Quick access to console, alerts, and diagnostics
Common Server Providers
Different providers organize their dashboards differently. Here’s where to find your SSH details:
Digital Ocean
- Log into your Digital Ocean Dashboard
- Click on your Droplet
- Find your connection details:
- Host: Listed as “ipv4” on the droplet page
- Username:
root(default for new droplets) - Password: Sent to your email, or use SSH keys if configured
- Port:
22(default)
Linode (Akamai)
- Log into your Linode Cloud Manager
- Click on your Linode instance
- Connection details:
- Host: “SSH Access” shows your IP address
- Username:
root(default) - Password: Set during Linode creation, or use SSH keys
- Port:
22(default)
AWS EC2
- Log into your AWS Console
- Navigate to EC2 → Instances
- Select your instance:
- Host: Listed as “Public IPv4 address”
- Username:
- Ubuntu AMIs:
ubuntu - Amazon Linux:
ec2-user - Debian:
admin
- Ubuntu AMIs:
- SSH Key: Use the
.pemkey you downloaded when creating the instance - Port:
22(default, check security group rules)
Note: AWS uses SSH keys by default. You’ll need to add your key to Nexus.
Hetzner
- Log into Hetzner Cloud Console
- Select your project and server
- Connection details:
- Host: Shown as “IPv4” on the server overview
- Username:
root(default) - Password: Sent to your email on server creation, or use SSH keys
- Port:
22(default)
Vultr
- Log into your Vultr Dashboard
- Click on your server instance
- Connection details:
- Host: Listed as “IP Address” or “Main IP”
- Username:
root(default) - Password: Click the eye icon to reveal, or use SSH keys
- Port:
22(default)
OVH
- Log into your OVH Manager
- Go to Bare Metal Cloud → VPS
- Select your VPS:
- Host: Listed as “IPv4”
- Username: Depends on OS (usually
ubuntu,debian, orcentos) - Password: Sent to your email, or use SSH keys
- Port:
22(default)
Troubleshooting
Can’t Connect?
- Check your IP address: Make sure you’re using the public IP, not a private one
- Verify firewall rules: Ensure port 22 is open in your VPS firewall/security groups
- Confirm SSH is running: Your server should have SSH enabled by default
- Try password auth: If using SSH keys, make sure the key format is correct
Connection Timeout?
- Your server might be behind a firewall blocking port 22
- Check your VPS provider’s security group or firewall settings
- Ensure your server is running and not in a stopped/suspended state
Wrong Username?
Different distributions use different default users:
- Ubuntu:
ubuntuorroot - Debian:
debianorroot - CentOS:
centosorroot - Amazon Linux:
ec2-user
Check your provider’s documentation for the correct default user.
Next Steps
Now that your server is connected:
- Set up alerts to get notified of issues
- Explore the AI agent for automated diagnostics
- Manage virtual machines if you’re running Proxmox or other hypervisors
- Pair more servers to manage your entire infrastructure
Security Best Practices
- Change default passwords: After connecting, update your root password
- Set up SSH keys: More secure than password authentication
- Enable 2FA on your VPS provider: Protect access to your server dashboard
- Use Nexus security features: Set up biometric authentication and access PIN
All your credentials are encrypted and stored in your device’s secure enclave. Learn more about how Nexus protects your data.